In[]
Limits[]
To see the residence limits that apply to you, enter /res limits
You should see something like this:
Important limits[]
- Max residences - This is the maximum number of residences you can have at a time
- Max North/South size - the max size of the residence along the "Z" axis
- Max Up/Down size - the max size of the residence along the "Y" axis
- Min/Max protection height - currently bedrock to upper limit
- Max subzone depth - Limits of subzone nesting (see Subzones section)
- Can Set Enter/Leave Messages - If true, you can change the messages a player gets when entering/leaving your residence.
- Number of Residences you own - If this is less than the maximum number allowed, you can make a new one.
- Residence Cost Per Block - see "Cost" section below
Cost[]
Please note, residences cost (IN GAME) money to create. They cost $0.05 per block that is protected. If you protect a 12x12x4 area, this will cost $29 (IN GAME).
Setup[]
In order to select the area for your residence, you will need a wooden axe. If you do not have one, you can get one from the residence kit by typing, /kit residence.
Residences are protected in cu width X height) so find the area you want to cover up mate
Selecting a residence area[]
Take your wooden axe (see Setup section above) and LEFT CLICK the lower left block of the area you want to protect, then go around and RIGHT CLICK the top block on the opposite side of the cube.
This is easier to understand visually.
In the following image:
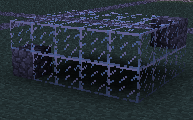
You would take your wooden axe, and LEFT CLICK the cobblestone on the lower left, and then RIGHT CLICK the cobblestone on the back side.
When you select the first point, it should confirm with the coordinates of the PRIMARY SELECTION POINT. Selecting the second point should confirm with the coordinates of the SECONDARY SELECTION POINT.
Creating the residence[]
After you have selected the residence, enter the following command:
/res create RESIDENCENAME
(where RESIDENCENAME is a name of your choice)
Video Tutorial[]
Here is a video on Youtube that explains how to select and create as well:

How to use Residence plugin
Permissions & Flags[]
- /res set <ResidenceName> [flag] [true/false/remove] - set flags on residences.
- /res gset <ResidenceName> [GroupName] [flag] [true/false/remove] - set flags on different groups
- /res pset <ResidenceName> [PlayerName] [flag] [true/false/remove] - set flags on different players
- /res lset <ResidenceName> [blacklist/ignorelist] [material] - add/remove a material from the residence's blacklist/ignorelist.
- /res lset <ResidenceName> info - list the Residence's blacklist/ignorelist settings.
- /res mirror [FullSourceName] [TargetName] - set the TargetName space to have the same flags as SourceName.
Flags
- move - true allows move rights
- build - true allows build rights
- use - true allows use of buttons, levers, doors, and crafting tables
- container - true allows use of chests, furnaces, and dispencers
- pvp - disabled
- ignite - disabled
- subzone - true allows subzoning
- firespread - disabled
- damage - disabled
- tnt - disabled
- creeper - disabled
- monsters - disabled
- flow - true allows liquid movement
- tp - disabled
PwnStyleAG 10:09, January 27, 2012 (UTC)
Subzones[]
You can divide a residence area into smaller subzones to manage permissions at a smaller level. This is useful because you can create a large residence area, and then divide it into subzones, and give each user their own subzone with permissions to build.
To create a subzone, you select an area with your wooden axe just like you select a residence. Once you have made your selection, the command is /res subzone <ResidenceName> <SubZoneName>
Keep in mind that the subzone must be contained inside the area of the residence, and it cannot overlap with any other subzones.
The name of the subzone will be ResidenceName.SubZoneName
Another feature of subzones, is that they can be nested. For example, you can create a subzone inside of another subzone. The name would be ResidenceName.SubZoneName.LowerSubZoneName
See the Permissions & Flags section above for details on how to set permissions on a subzone (just subtitute <ResidenceName> for <ResidenceName>.<SubZoneName> when setting perms).
Market[]
Become a landlord and rent to tenants by creating subzones in your residence. They'll appear in market and you can rent them out.
- /res subzone <ResidenceName> [SubZoneName] - create a subzone in your residence. You must be the owner to do this.
- /res market rentable [Main residence name].[subplot name] [rent cost] [# of days] [repeat: true/false] - put up a subplot on the market for rent/
- /res market [buy/info] [residence] - buy / view info on a residence for sale.
- /res market sell [residence] [amount] - put up a residence for sale
- /res market unsell [residence] - remove a residence from selling.
- /res lease [renew/cost] [residence] - renew / show cost of renewing a residence. Cost only applies if using iConomy.
- /res market list - see all properties that are available for purchase or rent
- /Balance - Check your current amount
Rename/Remove[]
Messages[]
You can control the message people see when entering your residence.
When changing a message, you can use %player to show the name of the player, %residence to show the residence’s name, and %owner to show the owner’s name.
The command to set the messages is:
/res message [residence] [enter/leave] [message]
For example, if you own a residence named "MyHouse", you could set a message like this:
/res message MyHouse enter Hi %player - welcome to %residence - created by %owner
Command List[]
See the Command List page on the Residence wiki for a complete list of commands.
Additional Info[]
There is an example residence at the /spawn area that shows how residences are selected.
Here are 3 screenshots of the example residence at /spawn on the server:
")
")
")